RawCap Redux
![]() A new version of
RawCap has been released today.
This portable little sniffer now supports writing PCAP data to stdout and named pipes as an alternative to saving the captured packets to disk.
We have also changed the target .NET Framework version from 2.0 to 4.7.2, so that you can run RawCap on a modern Windows OS without having to install a legacy .NET Framework.
A new version of
RawCap has been released today.
This portable little sniffer now supports writing PCAP data to stdout and named pipes as an alternative to saving the captured packets to disk.
We have also changed the target .NET Framework version from 2.0 to 4.7.2, so that you can run RawCap on a modern Windows OS without having to install a legacy .NET Framework.
Here’s a summary of the improvements in the new RawCap version (0.2.0.0) compared to the old version (0.1.5.0):
- Uses .NET 4.7.2 instead of 2.0
- Support for writing to stdout
- Support for writing to named pipes
- Large (64 MB) ring buffer to prevent packet drops
- Automatic firewall configuration
Out of the software we develop and maintain here at Netresec, NetworkMiner is the most popular one. But you’re probably not aware that RawCap is our second most popular tool in terms of downloads, with around 100 unique downloads every day. RawCap started out as just being a quick hack that we released for free to the community in 2011 without expecting it to gain much attention. However, it quickly gained popularity, maybe due to the fact that it’s just a tiny .exe file and that it doesn’t require any external libraries or DLL’s to sniff network traffic (other than the .NET Framework).
RawCap embraces the Unix philosophy to do only one thing, and do it well. Thanks to RawCap’s simplicity we have only needed to make a few minor updates of the tool since its first release 9 years ago. However, today we’re finally adding some new features that have been requested by users over the years. One such feature is that RawCap now automatically creates a Windows firewall rule when the tool is started. Before this feature was introduced users would have to run wf.msc (i.e. the "Windows Defender Firewall with Advanced Security") and manually create an inbound rule to allow RawCap.exe to receive incoming traffic. Without such a firewall rule RawCap would only be able to capture outgoing traffic.
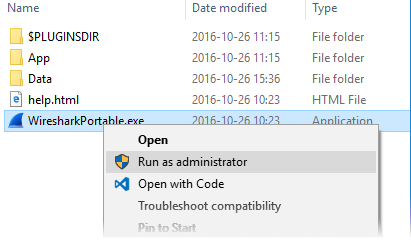
RawCap can be started in two different modes. Either as an interactive console application, or as a “normal” command line utility. Run RawCap.exe without any arguments, or simply double click the RawCap.exe icon to use the interactive mode. You will then be asked which interface to capture packets from and what filename you’d like to save them to.
Network interfaces:
0. 192.168.0.17 Local Area Connection
1. 192.168.0.47 Wireless Network Connection
2. 90.130.211.54 3G UMTS Internet
3. 192.168.111.1 VMware Network Adapter VMnet1
4. 192.168.222.1 VMware Network Adapter VMnet2
5. 127.0.0.1 Loopback Pseudo-Interface
Select network interface to sniff [default '0']: 1
Output path or filename [default 'dumpfile.pcap']:
Sniffing IP : 192.168.0.47
Output File : dumpfile.pcap
--- Press [Ctrl]+C to stop ---
Packets : 1337
The other alternative is to supply all the arguments to RawCap when it is started. Use
NETRESEC RawCap version 0.2.0.0
Usage: RawCap.exe [OPTIONS] <interface> <pcap_target>
<interface> can be an interface number or IP address
<pcap_target> can be filename, stdout (-) or named pipe (starting with \\.\pipe\)
OPTIONS:
-f Flush data to file after each packet (no buffer)
-c <count> Stop sniffing after receiving <count> packets
-s <sec> Stop sniffing after <sec> seconds
-m Disable automatic creation of RawCap firewall entry
-q Quiet, don't print packet count to standard out
INTERFACES:
0. IP : 169.254.63.243
NIC Name : Local Area Connection
NIC Type : Ethernet
1. IP : 192.168.1.129
NIC Name : WiFi
NIC Type : Wireless80211
2. IP : 127.0.0.1
NIC Name : Loopback Pseudo-Interface 1
NIC Type : Loopback
3. IP : 10.165.240.132
NIC Name : Mobile 12
NIC Type : Wwanpp
Example 1: RawCap.exe 0 dumpfile.pcap
Example 2: RawCap.exe -s 60 127.0.0.1 localhost.pcap
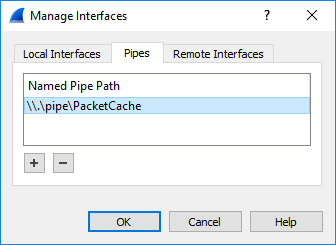
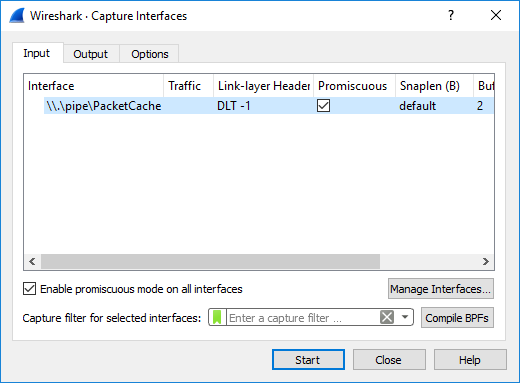
Example 3: RawCap.exe 127.0.0.1 \\.\pipe\RawCap
Example 4: RawCap.exe -q 127.0.0.1 - | Wireshark.exe -i - -k
As you can see, running “RawCap.exe -s 60 127.0.0.1 localhost.pcap” will capture packets from localhost to a file called “localhost.pcap” for 60 seconds and then exit.
There are a couple of drawbacks with the new RawCap version though, it is a larger binary (48kB instead of 23kB) and it uses more CPU and RAM compared to the old version. We will therefore continue making the old RawCap version available to anyone who might need it.
Visit the RawCap product page to download this tool and learn more.
Posted by Erik Hjelmvik on Thursday, 30 January 2020 14:32:00 (UTC/GMT)
Tags: #Netresec #RawCap #sniffer #PCAP #named pipe #Wireshark #WiFi #loopback #127.0.0.1